Delves
Valeera Has Six Poisons. The 25% Damage Pick Has the Hardest Condition
Patch 12.1 lets Delve players choose Valeera's poison separately from her role and adds three more options through the Season 2 introduction. The largest damage number disappears when its wielder takes a hit, while the safer poisons solve very different problems.

Valeera's new poison menu turns a background companion passive into a real Delve choice—and the option that says “25% more damage” is not the automatic winner.
In Season 1, Valeera picked a poison for you. Tank Valeera brought Bloodcrypt Toxin, her damage role brought Poison of the Forgotten Master, and healer Valeera brought Soulthirst Venom. Patch 12.1's current data separates poison from role. The Season 2 Delve introduction adds Bursting Toad Toxin, Frostheart Venom, and Phantasmal Spore Toxin, expanding the menu from three effects to six.
That matters because the poisons answer different ways a Delve goes wrong. One reduces incoming damage. One rewards a player who never gets touched. One adds sustain and movement. The new trio offers area damage, attack-and-cast slowing, or automatic disruption. Pick for the part of the run most likely to end the attempt, not for the role icon beside Valeera's portrait.
The three new poisons are still based on PTR records before the August 11 launch. Their numbers, proc rules, and boss interactions need to be confirmed on live servers.
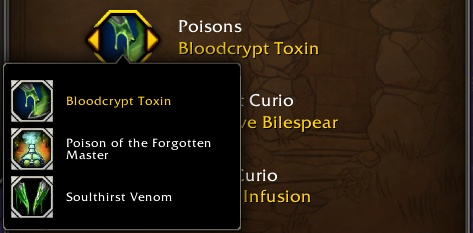
Six poisons, six different jobs
| Poison | Current effect | Best first use | The catch |
|---|---|---|---|
| Bloodcrypt Toxin | Struck enemies deal 10% less damage and have 10% less Haste for 20 seconds. | Blind progression and dangerous bosses. | Valeera or an ally must hit each important enemy with a poisoned weapon; some enemies may ignore control. |
| Poison of the Forgotten Master | Its wielder gains 5% damage every three seconds in combat, up to 25%. | Clean, practiced fights with little incoming damage. | All stacks on that wielder disappear upon taking damage. |
| Soulthirst Venom | Grants 10% Leech, Avoidance, and Speed. | Recovery, area-damage survival, and movement-heavy rooms. | Reliable rather than explosive; it has no large burst proc. |
| Bursting Toad Toxin | A hit can make the target pulse Nature damage around itself for eight seconds. | Stacked trash around a durable target. | PTR data lists a 12-second internal cooldown; spread or dying targets waste pulses. |
| Frostheart Venom | A hit can slow movement by 30% and attacks and casting by 20% for ten seconds. | Busy pulls where reducing enemy tempo creates room to react. | Immunities and scripted boss casts can sharply reduce its value. |
| Phantasmal Spore Toxin | A hit can interrupt and fear for one second. | Experimental automatic disruption. | PTR text disagrees about fear, knockback, and stun; movement could disturb a pull. |
The table is a starting map, not a ranking. A poison can be excellent at its job and useless against a room that asks a different question.
Forgotten Master is a ceiling, not a default
Poison of the Forgotten Master needs fifteen uninterrupted seconds in combat to reach five stacks. Then one instance of damage clears every stack from that wielder.
On a ranged character with a clean boss plan, that can be excellent. A player who avoids every frontal, pool, projectile, and add can turn the poison into a substantial sustained bonus. It also has a natural place in a group where someone else reliably owns enemy attention.
Messy Delves attack the condition from every direction. Ambient pulses, unavoidable boss damage, a stray caster, a newly spawned add, or a second pack can reset the ramp. A 25% maximum means little if the buff repeatedly climbs to five or ten and falls back to zero.
The tooltip says the stacks fall when “the wielder” takes damage. That points to an individual check rather than one ally being hit clearing the whole party, but it still needs a live test. So do absorbed hits, damage-over-time ticks, self-damage, and scripted environmental effects. Those details decide whether Forgotten Master is a boss option or a target-dummy fantasy.
The right test is simple: watch the buff during an actual clear. If it holds near five stacks through most of the dangerous fight, keep it. If ordinary unavoidable damage keeps erasing the ramp, another poison will contribute more despite showing a smaller headline number.
Bloodcrypt is the blind-progression pick
Bloodcrypt Toxin is less glamorous and much easier to trust. Valeera coats her own and her allies' weapons; enemies struck by those poisoned weapons deal 10% less damage and lose 10% Haste for 20 seconds.
For a first Tier 11 clear, a Nemesis attempt, or an unfamiliar Season 2 boss, that is broad protection. The damage reduction lives on the enemy rather than asking the player to remain inside one of Valeera's ground effects. The Haste reduction can reduce the tempo of ordinary attacks and some repeated actions, though bosses and specific mechanics may ignore part of that control.
It also works well when information is scarce. Flat enemy damage reduction covers more early mistakes than a damage buff that vanishes on the first one. Bloodcrypt is the sensible learning choice; it does not need to remain the farm choice after the damage pattern is understood.
Soulthirst Venom occupies the middle. Ten percent Leech, Avoidance, and Speed adds personal recovery, softens area damage, and makes repositioning easier without depending on a target proc. Specs with solid mitigation but weak recovery may value it more than another enemy debuff. It is also the clean fallback in Delves whose unavoidable damage repeatedly ruins Forgotten Master.
The new trio is built around pull shape
Bursting Toad Toxin is the obvious stacked-trash candidate. Current PTR data gives it a 60% trigger chance and a 12-second internal cooldown, then makes the target pulse Nature damage for eight seconds to enemies within eight yards. The effect wants several enemies gathered around one target that will live for the full pulse.
One PTR player described its damage as exceptionally strong. That is worth testing, not treating as settled balance. A target that dies immediately, runs away, or stands apart from the pack can throw away most of the proc, and launch tuning can still change the numbers.
Frostheart Venom attacks tempo instead of health. Its proc slows movement and reduces melee attacks, ranged attacks, and casting speed for ten seconds. That can make a multi-caster pull easier to read and reduce the number of attacks arriving while the player repositions. It will be less impressive against immune enemies or bosses whose dangerous abilities follow fixed scripts rather than ordinary cast speed.
Phantasmal Spore Toxin is the volatile option. Its primary PTR description says the proc interrupts and fears for one second on a six-second internal cooldown. Its buff summary also mentions a knockback and stun. Those are not interchangeable effects, and the text should not be silently harmonized before launch.
Even the stated fear needs caution. A one-second stop may save an interrupt, but a moving enemy can approach an unpulled pack, leave an area effect, or separate itself from cleave. Wowhead commenters noticed that risk immediately. Until live testing shows whether enemies flee, cower, get knocked, or simply stop, Phantasmal Spore is a test-run poison rather than progression advice.
A poison menu cannot fix companion behavior
The community response to selectable poisons has come with an important caveat: players still report inconsistent Valeera damage, confusing healing feedback, unexpected targeting, and runs where her contribution seems to change after a role or Curio adjustment.
Those reports do not establish one confirmed bug, and complaints about Valeera below level 90 should not be projected onto max-level endgame Delves. They do establish a trust problem. A theoretically perfect poison is not useful if the selected loadout is not behaving as expected or Valeera is attacking the wrong target.
Before a serious attempt, stop at the entrance and check three things:
- 1. Valeera is in the intended role.
- 2. The poison shown in companion supplies is the poison you selected.
- 3. The expected buff or enemy debuff appears during the first safe pull.
If something looks wrong, record the role, poison, Curios, player level, spec, Delve, and enemy before changing the setup. Some players say toggling options restored expected behavior, but that is a troubleshooting anecdote, not a reliable fix. Good reports preserve the state that produced the problem.
Start safe, then earn the damage option
The practical Season 2 order is straightforward:
- 1. Begin unfamiliar high tiers with Bloodcrypt Toxin or Soulthirst Venom.
- 2. Try Bursting Toad when stacked trash, rather than boss survival, controls the run.
- 3. Test Frostheart on caster-heavy pulls and note which enemies actually accept its slows.
- 4. Keep Phantasmal Spore away from loosely packed rooms until its control behavior is verified.
- 5. Move to Forgotten Master only after a real run proves the character can retain its stacks.
Selectable poisons are a better direction for Delves because Valeera's role and the player's need are not the same thing. A healer Valeera can still accompany a player who needs Bursting Toad damage. A tank Valeera can pair with Soulthirst movement and Leech. A damage Valeera can bring Bloodcrypt while the player learns a Nemesis boss.
Patch day still has a verification list: confirm that all six choices are available after the introduction, compare the live proc values, test what removes Forgotten Master stacks, settle Phantasmal Spore's conflicting text, and identify boss immunities. The full Bountiful Delve and Season 2 reward loop begins August 18, leaving a week to test the menu before the serious climb.
Valeera now offers six answers. The smart choice is the one that solves the failure your run is actually having—not the one with the largest number in perfect conditions.